
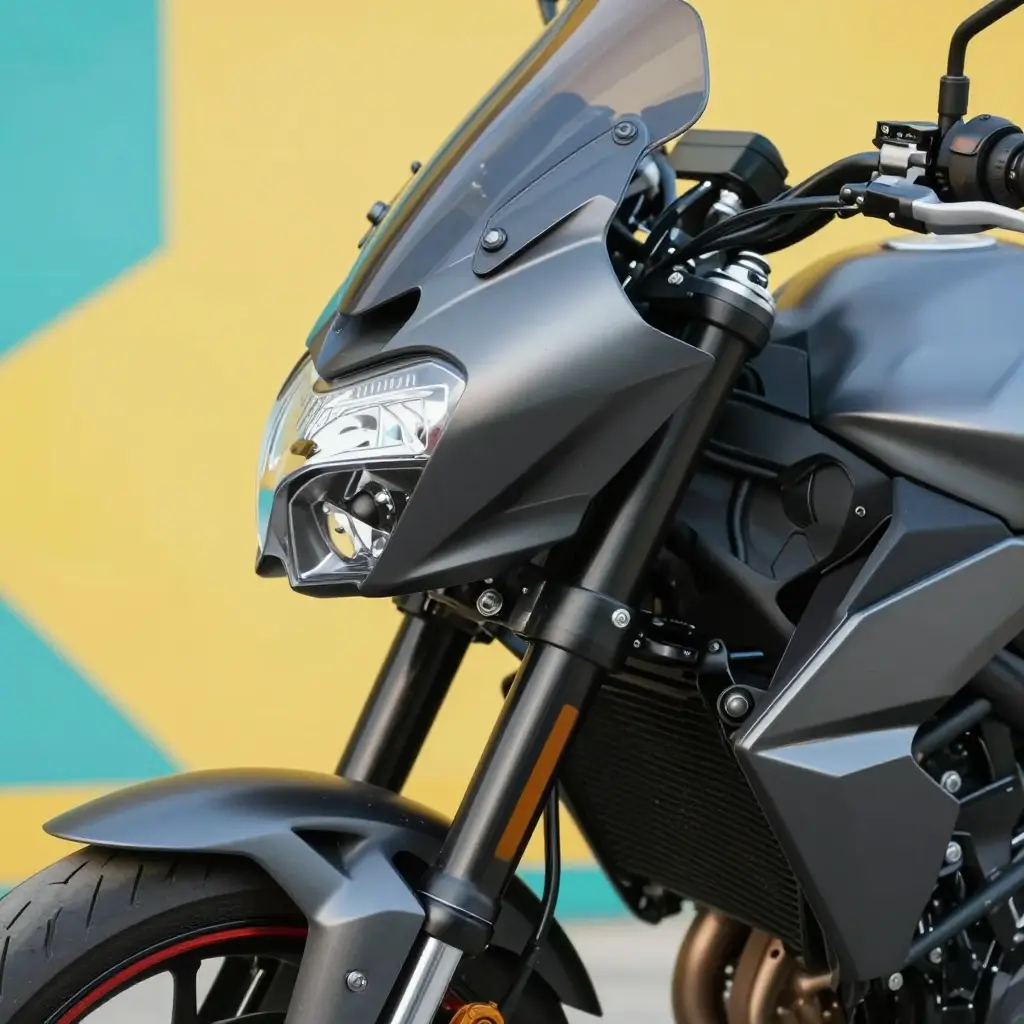
Introduction: Why Fairing Fitment Gaps Matter
An aftermarket motorcycle fairing is a replacement body panel set — nose, side panels, tail, and belly sections — built by a company other than the original equipment manufacturer (OEM). Riders buy them to repair crash damage, restore discontinued models, change color, or convert a street bike into a track build, usually at a fraction of factory pricing.
Fairing fitment is how precisely those panels meet the motorcycle: the panel-to-panel seams, the alignment against the frame and tank, and the size of the visible spaces — the gaps — between adjoining pieces. Poor fitment is more than an eyesore. It decides whether mounting bolts thread cleanly, whether panels vibrate at speed, whether paint edges crack, and whether wind and water reach the electronics underneath.
Fitment quality comes down mainly to two variables. The first is the accuracy of the mount points — the tabs, bosses, and drilled holes molded into each panel that must line up with the frame and with every neighboring piece. The second is the ABS resin grade, the specific blend of acrylonitrile butadiene styrene used to mold the shell. The blend sets stiffness, impact resistance, how much the panel shrinks as it cools, and how well it holds its original shape over time.
When both are right, the fairing installs like OEM. When either is off, gaps open up: uneven seams, stressed tabs, cracked mounting ears, and panels that never sit flush no matter how much you adjust them.
Most fitment problems riders run into trace back to mold accuracy, tooling wear, and resin choice, so those are the threads running through the rest of this guide: how mold accuracy and tooling tolerances drive mount point alignment, how ABS grades differ between budget and premium suppliers, why resin shrinkage reshapes gaps after molding, how to spot a good kit before you buy, how to shim a set that doesn’t fit, and how a shop can trace a fitment fault quickly.
What Mount Points Are and Why They Control Every Gap
Every fairing panel sits relative to something solid, and that something is a mount point. A mount point is any engineered attachment location on the bike where a panel, bracket, or subassembly is bolted, clipped, or seated. Understanding fairing mount points explains why an aftermarket motorcycle fairing either snaps into place or fights you through every bolt.
How Panels Actually Attach
Fairing panels rarely bolt directly to the frame. They connect through a short chain of hardware, and each link has to land where the factory intended:
- Tabs — molded plastic projections that slot into a receiver or capture a clip, transferring load from the panel into the structure.
- Brackets — metal or plastic stays that bridge the gap between a panel and the frame, engine, or subframe.
- Grommets — rubber isolators that absorb vibration while centering a tab in its hole. A worn grommet lets a panel drift.
- Bolts and fasteners — the final lock, clamping the stack together once alignment is correct.
Each mount point acts as a fixed reference. Once the first bolt tightens, that point becomes the origin every other edge is measured against.
Why a Two-Millimeter Deviation Snowballs
Picture a single mount sitting 2 mm off — a warped bracket, a slightly short tab, or a hole drilled a hair too far forward. That 2 mm pulls the panel’s edge out of line. The next panel shares a seam with the first, inherits the error, and adds its own tolerance, so the visible gap grows to 4 mm or more. Keep going along the bodywork and the deviation stacks like a running total; by the tail section you can be looking at a crooked gap big enough to see daylight through. Fitment is a geometry problem before it is anything else, and the mount points are the only fixed coordinates you have.
The Four Categories of Mount Points
- Frame-mounted — bolted to the main chassis; the most rigid and most critical reference.
- Engine-mounted — anchored to the engine cases; sensitive to vibration and heat expansion.
- Subframe-mounted — attached to the rear subframe, common on tail and seat units.
- Panel-to-panel tabs — connect one panel directly to another, so errors travel freely between them.
If the references are right, the gaps close themselves.
ABS Resin Grade: The Hidden Variable Behind Warping and Gaps
When a fairing doesn’t line up, most riders blame the mount points. Sometimes the plastic is the problem. The ABS resin grade decides how a panel behaves months after it has been bolted on.
What Is ABS Plastic?
ABS (Acrylonitrile Butadiene Styrene) is a thermoplastic — a plastic that softens when heated and hardens when cooled. Manufacturers polymerize styrene and acrylonitrile in the presence of polybutadiene rubber, which produces a rigid matrix shot through with a rubber phase.
- Acrylonitrile adds chemical resistance, hardness, and heat tolerance.
- Butadiene is the rubber phase that absorbs impact.
- Styrene delivers a glossy finish and easy molding.
That combination is why ABS became the default motorcycle fairing material. It is light, tough, easy to mold into complex curves, and cheap to replace.
Why the Monomer Ratio Matters
ABS gets its range of properties from the ratio of those three monomers. Change the proportions and you change the material.
| Monomer | Primary Contribution | Trade-off |
|---|---|---|
| Acrylonitrile | Stiffness, heat tolerance | Too much becomes brittle |
| Butadiene | Impact resistance | Too much reduces rigidity |
| Styrene | Gloss, flow, rigidity | Too much weakens toughness |
High butadiene content gives impact resistance — the panel flexes instead of cracking. High acrylonitrile brings stiffness and heat tolerance. Only a balanced blend delivers the dimensional stability that keeps bolt holes aligned.
Why Cheap ABS Warps
Lower-grade or over-recycled ABS behaves differently. Reprocessed plastic has inconsistent shrinkage rates, so panels cool unevenly and warp. They often fit on the bench, then open gaps after installation and sun exposure. Heat expands the resin, cooling contracts it, and the panel never quite returns to its original shape.
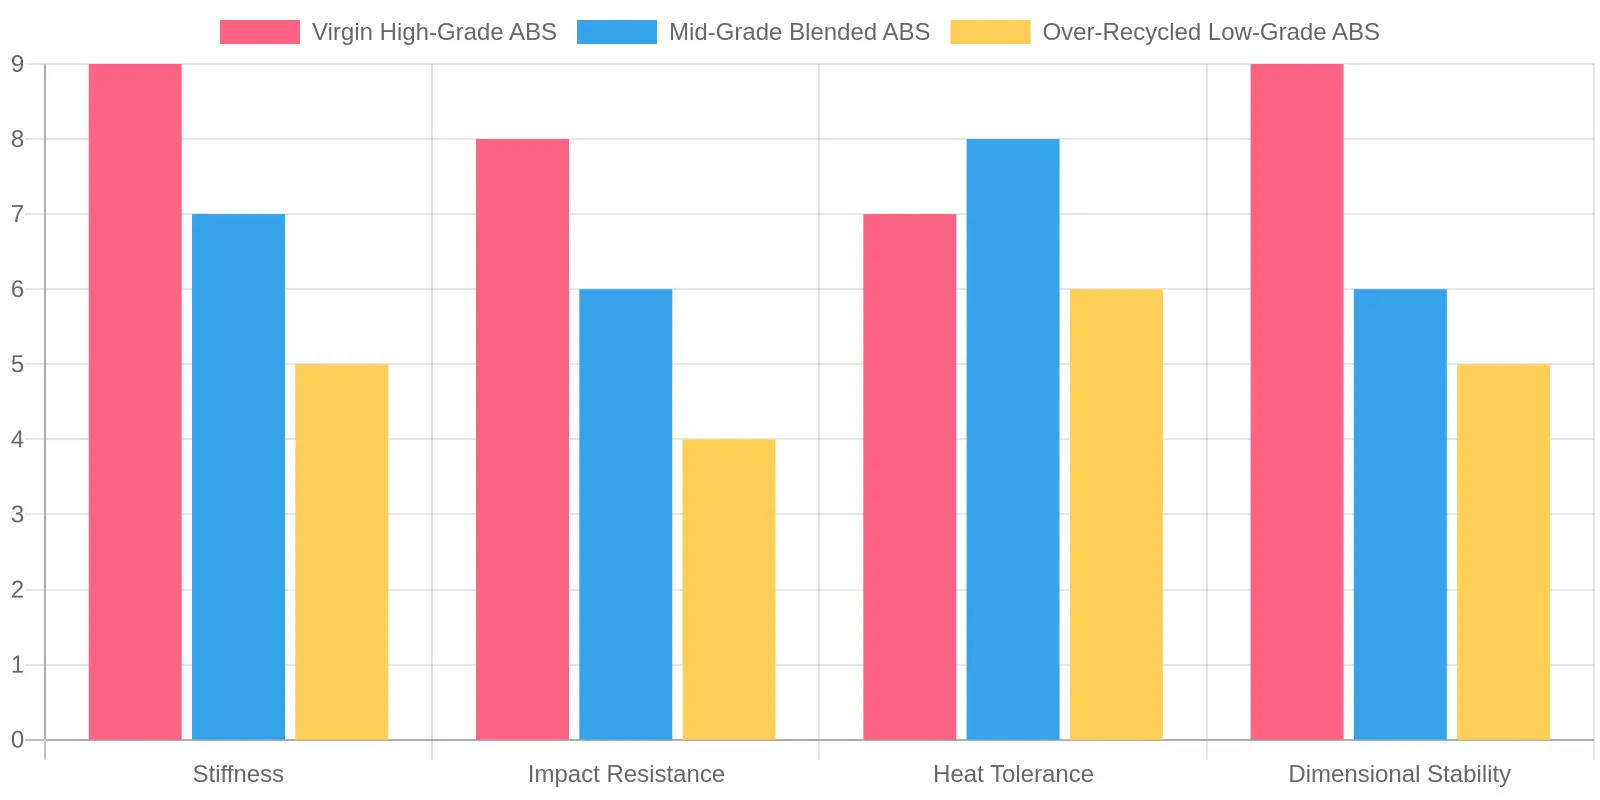
Performance drops sharply across those grades.
Check the Plastic Before the Brackets
Before blaming the brackets, check the plastic. A good ABS resin grade keeps panels stable; a weak one guarantees the very gaps you are trying to close.
What Really Causes Fairing Gaps?
When a kit refuses to sit flush, most riders blame the supplier or themselves. The causes are more varied than that. This chart breaks down the estimated share of fitment gap problems by root cause, and the pattern is hard to miss.
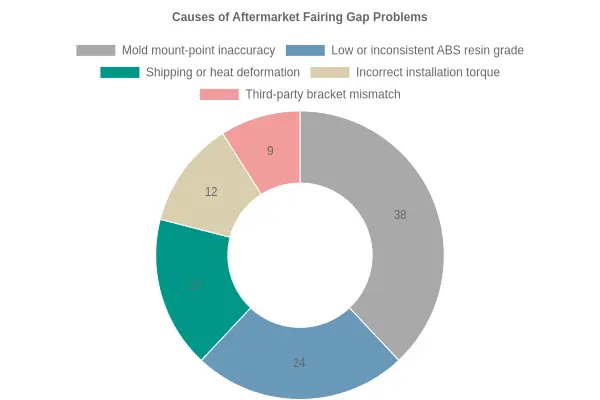
| Cause | Estimated Share |
|---|---|
| Mold mount-point inaccuracy | 38% |
| Low or inconsistent ABS resin grade | 24% |
| Shipping or heat deformation | 17% |
| Incorrect installation torque | 12% |
| Third-party bracket mismatch | 9% |
Where Gap Problems Come From
Two factors dominate. Mold mount-point inaccuracy accounts for roughly 38% of gap problems, and low or inconsistent ABS resin grade adds another 24%. Together they account for about 62% of all fitment issues — the clear majority.
The remaining causes matter less but are still worth knowing:
- Shipping or heat deformation (17%): Panels can warp in transit or under sun exposure before they even reach the bike.
- Incorrect installation torque (12%): Overtightening fasteners pulls panels out of alignment.
- Third-party bracket mismatch (9%): Mixing bracket brands with a mismatched kit introduces its own tolerance gaps.
Where to Look First
If you are chasing a stubborn gap, the chart tells you where to start. Precise mount points and a consistent resin formulation solve most problems before they begin; everything else is fine-tuning.
How Mount-Point Misalignment Translates Into Visible Gaps
Every fairing panel is positioned by two inputs: the geometry of its own edges and the location of its mounting points. When the two agree, the panel lands where the designer intended. When they diverge, the panel cannot bend to compensate. Mount-point misalignment is a translation error — a reference point that sits a few millimeters off its nominal position, dragging the whole panel with it.
The Mechanics of Deviation
The relationship is direct. A single mount point offset by 2 mm shifts the attached panel edge by roughly the same distance, and that displacement is amplified across the exposed seam. If a panel spans 300 mm between two fasteners and one anchor is displaced, the visible edge rotates rather than moves in parallel, opening a wedge-shaped gap that widens toward the far corner. The larger the panel, the more a small reference error shows up as a conspicuous misfit.
Cumulative Tolerance Stacking
The real trouble starts when several panels share a chassis. Each panel arrives with its own manufacturing tolerance, and each mount point carries its own positional tolerance. On a motorcycle, those tolerances stack rather than cancel. Three panels in a continuous seam can accumulate deviations of 1 mm each into a 3 mm gap at the joint, even though every individual piece falls within its specified range. That is why fairing fitment problems so often show up at the assembly stage and never during a standalone inspection.
Why Individually Correct Panels Still Misfit
A panel can look flawless on a bench and still produce an uneven seam once bolted down. Free-state geometry and constrained geometry are not the same thing. When fasteners force a panel against a misplaced anchor, the panel has to deform to close the distance, and that stress ripples along its length. The seam then reflects both the original misalignment and the elastic distortion used to hide it. Two perfect-looking panels can still refuse to meet cleanly.
Mold Quality and Long-Run Consistency
High-quality molds with reinforced, steel-backed tooling hold their mount-point geometry stable across thousands of cycles. Reinforced cores resist deflection under injection pressure, and hardened inserts keep locating features from creeping. Worn tooling erodes at the highest-stress regions first, typically the bosses that define mount points. Reverse-engineered molds compound the problem: they copy a finished panel rather than the original reference geometry, inheriting any dimensional drift and freezing it into every part. That is the dividing line between a dependable aftermarket motorcycle fairing and one that fights the frame at every seam.
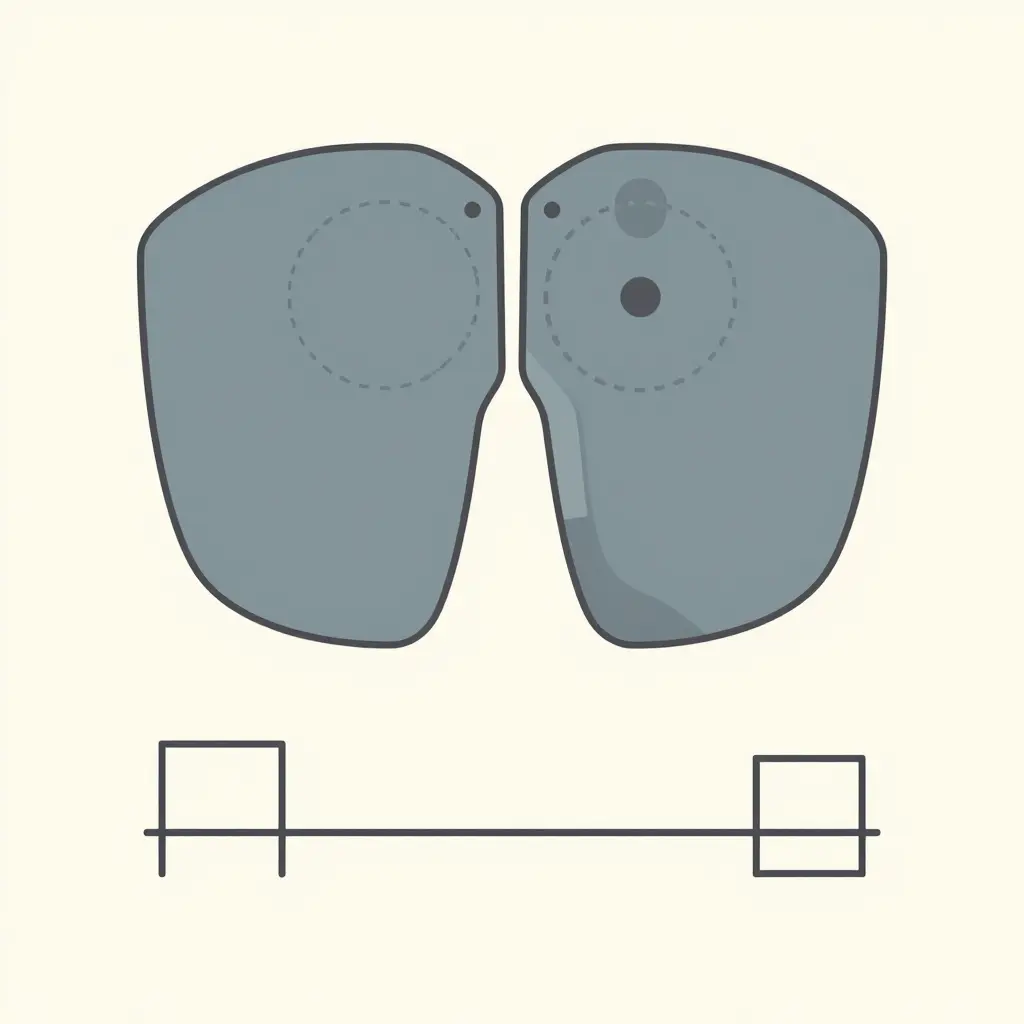
Not every ABS resin grade behaves the same once it is bolted onto your bike, so the table below breaks down how the most common options influence real-world fitment.
| Resin Grade | Typical Impact Resistance | Heat Deflection Tendency | Shrinkage & Warp Behavior | Effect on Fairing Gaps | Best For |
|---|---|---|---|---|---|
| Premium Virgin ABS | High – flexes on impact, resists cracking | Low – holds shape in engine heat | Minimal, uniform shrinkage | Tight, consistent panel gaps | Show builds & daily riders |
| Standard Virgin ABS | Moderate – handles minor bumps | Moderate – slight softening near exhaust | Low to moderate, occasional minor warp | Mostly even gaps, rare touch-ups | Daily riders |
| Blended ABS (ABS + PC) | Very high – excellent toughness | Low – strong thermal stability | Low shrinkage but stiffer, stress-crack risk | Smooth gaps when mounts are true | Show builds |
| Recycled-Content ABS | Low to moderate – more brittle | High – softens earlier | Higher, uneven shrinkage | Wider, inconsistent gaps needing shims | Budget daily riders |
The pattern: better resin buys predictable shrinkage and tighter gaps, while recycled content makes you fight for every millimeter. Blends sit in between, trading a little stiffness for toughness.
Fitment Checklist Before You Install
Good fairing fitment is decided long before the first bolt is torqued, and a short pre-purchase and pre-install inspection saves hours of rework. Run through this list every time you unbox an aftermarket motorcycle fairing, and you will catch the small defects that turn a clean build into a rattling, gappy mess.
- Confirm the exact mount-point count and location by laying the new panels against your OEM parts – a kit designed for a different trim or year often looks right until two of the six brackets refuse to line up.
- Verify the resin grade and shell thickness on the product label before you buy, because thin, low-grade ABS flexes at speed and opens seams that rigid, correctly specced material holds tight.
- Inspect every mounting tab and post for hairline cracking, stress whitening, or incomplete molding, and reject any panel that already shows fatigue before it ever sees road vibration.
- Test-fit all panels loosely on the bike first, snapping each piece into place by hand before you tighten anything to final torque.
- Use the correct grommets, rubber cushions, and shoulder bolts for each point, since mismatched hardware crushes tabs and defeats the damping the factory design relies on.
- Check seam gaps under natural daylight rather than garage lighting, walking around the bike from several angles so uneven reflections reveal misalignment you would otherwise miss.
- Account for heat expansion by leaving a small, even clearance at panel edges near the exhaust and engine, because plastic grows as it warms and tight tolerances will buckle or crack.
- Confirm the kit matches your exact model year, sub-model, and any factory options, since a single-year revision can shift a bracket by several millimeters.
- Photograph each mount point and gap before final assembly so you have a reference if a fitment problem appears later.
- Keep the packaging and hardware labeled until the fairing is fully seated, making any return or exchange far simpler.
Work through the steps in order and you install once, instead of chasing rattles and seam creep for the rest of the season.
Manufacturing Tolerances and Tooling Quality Behind Consistent Fitment
Consistent fairing fitment does not begin at the mounting bolt. It begins inside the mold. Every aftermarket fairing panel is effectively a snapshot of the tooling that produced it, and the dimensional accuracy of that tooling decides whether the finished panel lines up cleanly with the OEM mount points or fights them at every tab.
How the Mold Shapes Every Panel
Injection molding converts a fixed cavity into a repeatable part, but only when the tooling holds its geometry run after run. Three variables dominate the outcome.
Tooling condition. A polished, precisely cut steel or aluminum mold reproduces the same cavity dimensions indefinitely. As a mold wears, the parting line erodes, cavity surfaces lose their finish, and flash creeps into the part. Each of those small changes shifts the panel’s outer edge, its fastener bosses, and its mounting tabs, which are the exact features that govern fairing fitment.
Cooling uniformity. Plastic shrinks as it cools, and it shrinks unevenly when the mold’s cooling channels are not balanced. Cool zones freeze first and pull material inward; warmer zones lag and distort. The result is a panel that is dimensionally correct on the drawing yet warped in reality, so the bolt holes no longer align with the frame.
Clamp pressure. The press must hold both mold halves shut against the injection pressure. Insufficient or uneven clamping lets the halves separate slightly, thickening the part and introducing flash along the parting line. Excessive clamping can crush vents and stress the tool. Either extreme widens the tolerance band around every critical feature.
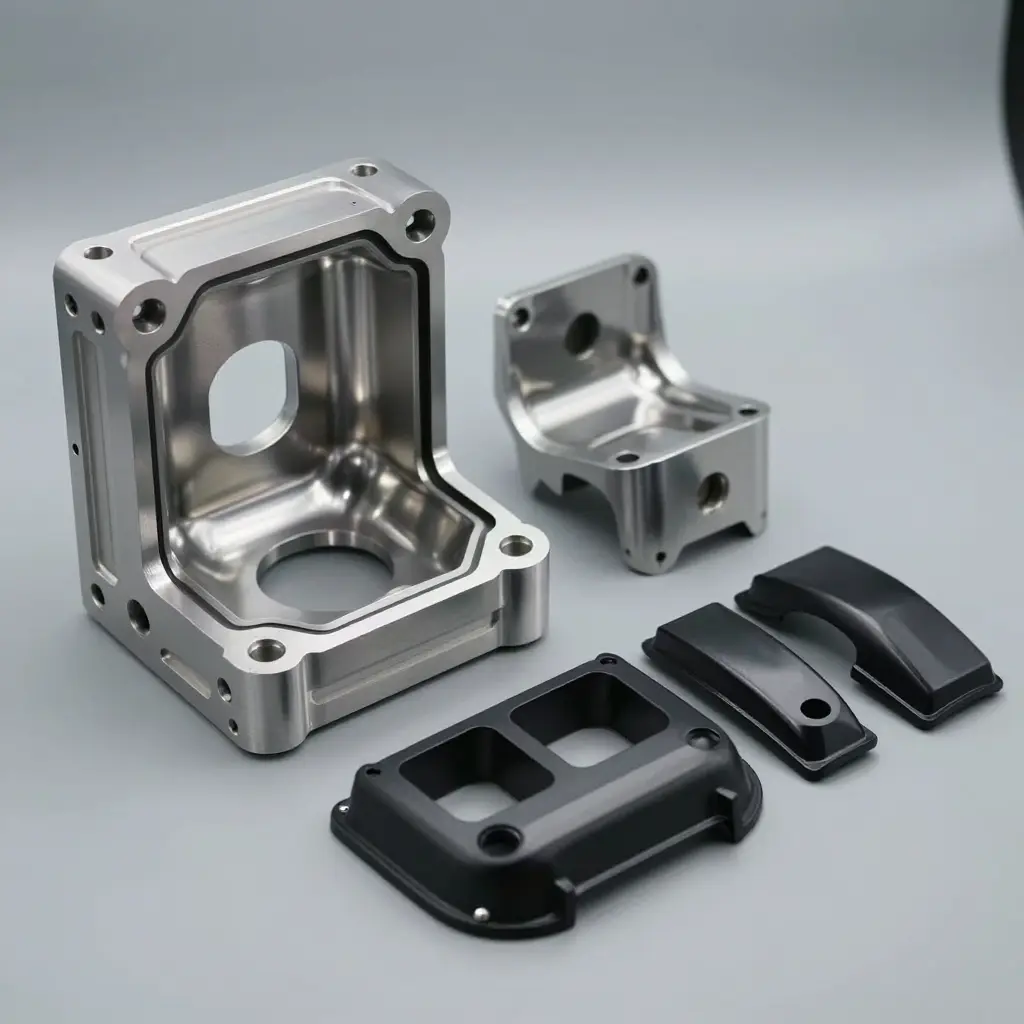
Why CNC-Machined Molds Hold Tighter Tolerances
Precision CNC-machined molds are cut from a digital model to tolerances measured in hundredths of a millimeter, so the cavity, core, and mount-point geometry reproduce the original design intent directly. Worn molds have simply drifted away from that geometry through heat cycles and abrasive resin. Reverse-engineered molds are a different problem: they are typically copied by scanning or hand-measuring an existing panel, a process that inherits the wear, warping, and finishing errors of the sample and then adds scanning error on top. When the source panel is already out of spec, the copy is out of spec by a wider margin.
The chart below shows how dimensional variance grows as tooling quality declines.
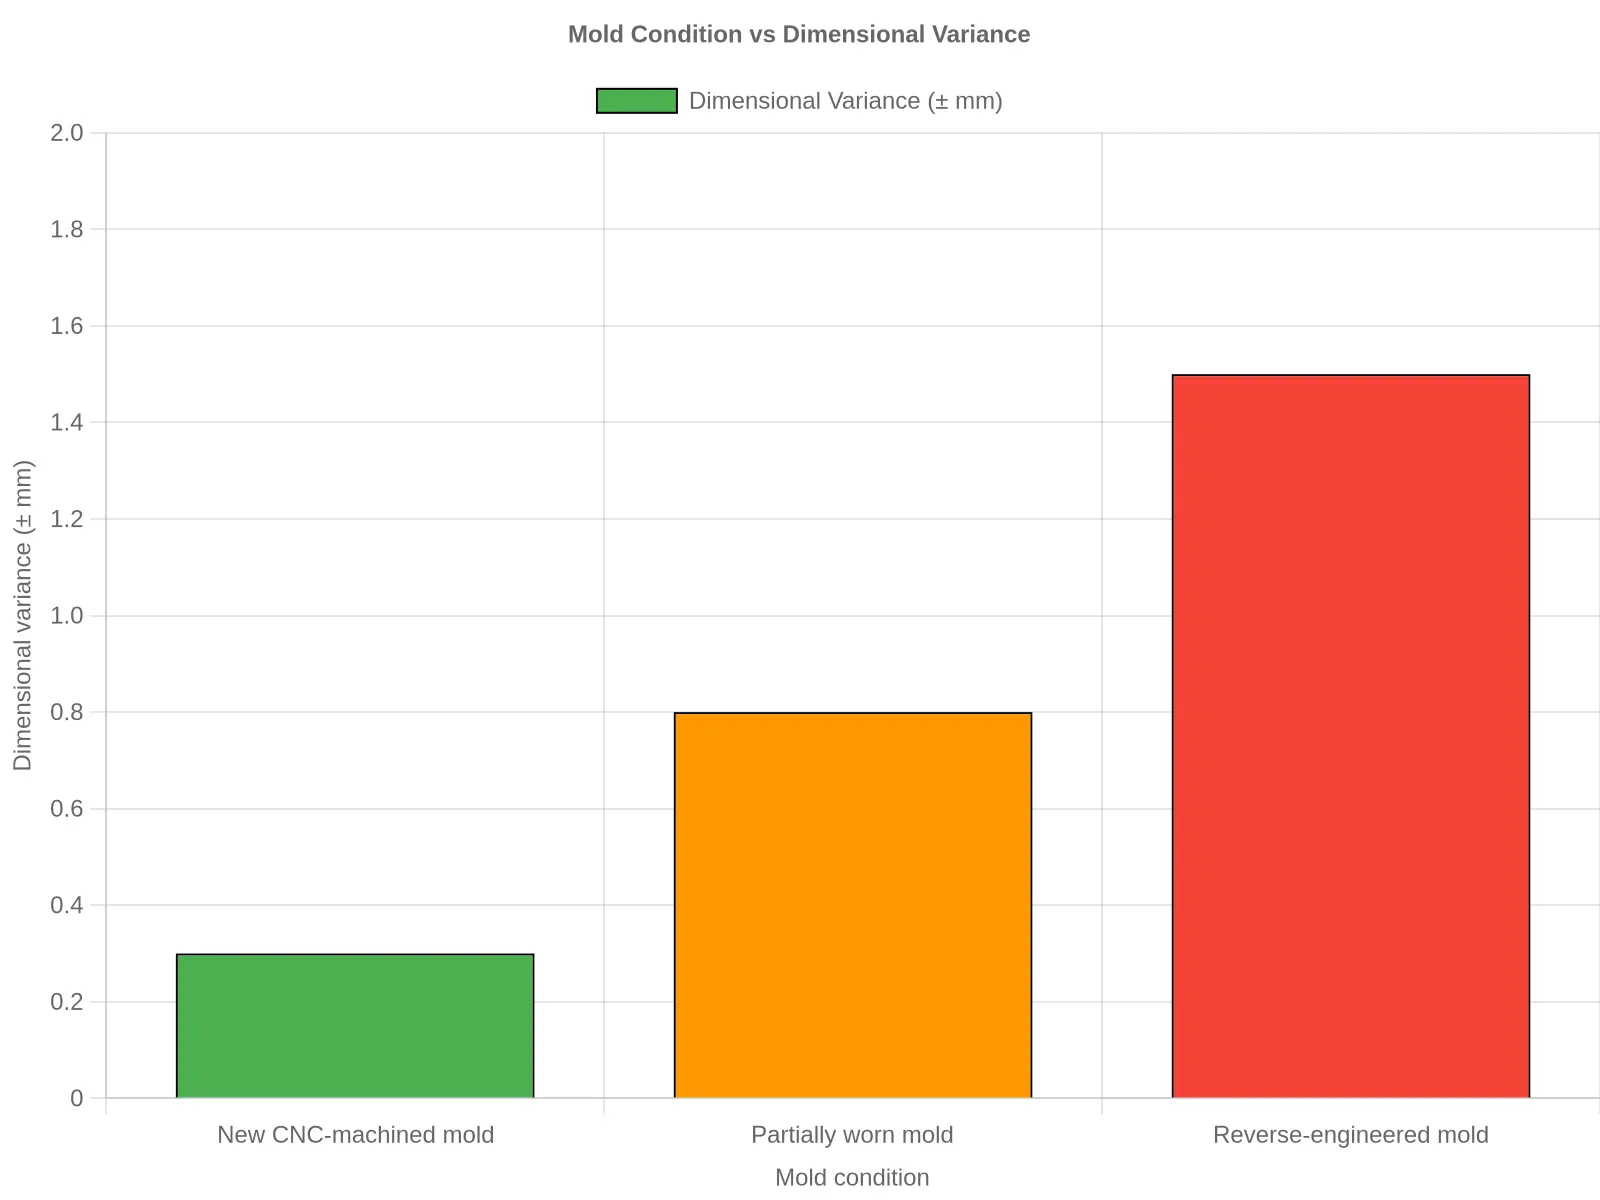
| Mold condition | Typical dimensional variance | Effect on mount-point accuracy |
|---|---|---|
| New CNC-machined mold | Approximately ±0.3 mm | Mount points align with OEM geometry |
| Partially worn mold | Approximately ±0.8 mm | Minor gaps and drift appear at panels |
| Reverse-engineered mold | Approximately ±1.5 mm or worse | Misaligned tabs and forced fitment |
Tooling, Mount Points, and Resin Together
Tooling quality is inseparable from the two factors that decide real-world gaps: mount-point accuracy and resin-grade consistency. A tight mold locks in the location of every tab and boss, so mount-point accuracy becomes a property of the tool rather than of luck at assembly. A well-maintained mold also tracks the intended shrinkage of the specified motorcycle fairing material. Pair a worn or copied mold with inconsistent resin and shrinkage moves in unpredictable directions; even high-grade ABS with predictable shrink behavior only performs as designed when the cavity holds its dimensions. Mount points and resin grade decide the gaps, and both are ultimately a manufacturing-tolerance story.
FAQ: Aftermarket Motorcycle Fairing Fitment
Do all aftermarket motorcycle fairing kits have gaps?
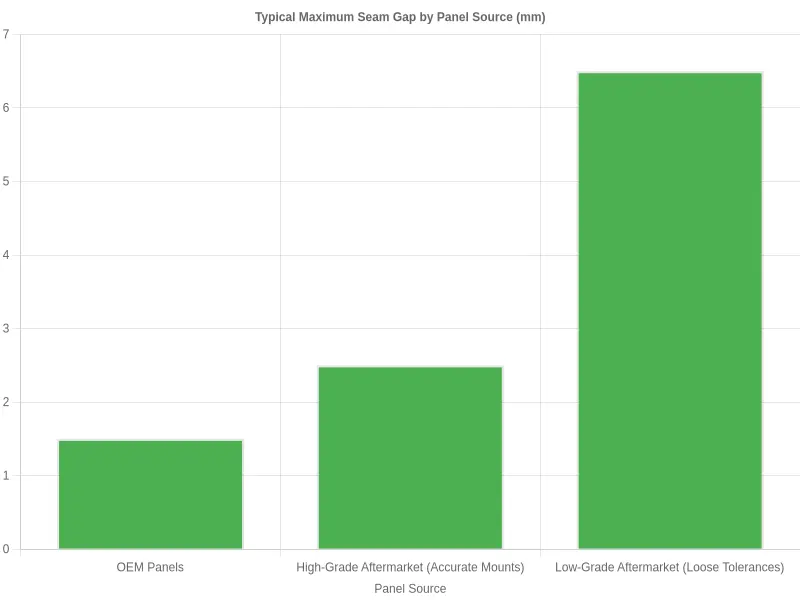
No, but visible gaps are far more common than riders expect. Most aftermarket motorcycle fairing panels are reverse-engineered from an original part, so some dimensional drift is normal even in a good set. The size of those gaps depends mostly on two things: how accurate the mold was and how strong the ABS resin grade is. A well-made kit with correct mount points usually sits within a millimeter or two of factory panels, while a cheap, thin-walled set can leave openings you can see from across the garage.
How can I tell whether the ABS resin grade is adequate?
Tap a panel and listen. A good ABS resin grade tends to give a solid, dull thud while a cheap blend can sound thin, though this is a rough check rather than a lab test. You can also flex a corner by hand — good panels spring back without whitening or cracking at the stress point. Ask the seller for the resin specification and wall thickness, and check whether the tabs are molded with the panel or glued on. Glued tabs are usually the first thing to fail, and they point to a low-grade material.
Can I fix gaps after I buy the fairing?
Sometimes, but only within limits. Minor fairing fitment issues can be improved by loosening all bolts, aligning the panels loosely, then tightening in a crisscross pattern so the kit settles evenly. Enlarging or shimming mount holes helps when a tab sits a few millimeters off. What you cannot correct by adjusting hardware is a badly warped panel, an undersized tab, or brittle material. If the core shape is wrong, no amount of fiddling will close a half-inch gap.
How do mount points differ between fairing kits?
Mount points are where fitment is won or lost. Some kits reuse factory grommets and bolts exactly, others ship with their own brackets and require you to relocate a few attachment points. A kit that matches the stock mounting geometry needs less effort and holds its shape better over time. A kit with redesigned brackets can still fit well, but it demands more patience during installation and usually a trial-and-error approach before everything lines up.
How does heat affect fitment over time?
Heat is the long-term enemy of fairing fitment. Engine heat, direct sun, and hot summer parking cause ABS plastic to expand, soften slightly, and slowly relax out of shape. A panel that fits snugly when new can develop new gaps after a season of thermal cycling, especially near the header and radiator. A higher ABS resin grade resists this warping better than a thin, recycled blend, which is why material quality matters as much as the initial gap you see on day one.
Are more expensive fairing kits always a better fit?
Not automatically, but price usually tracks material and mold quality. Pricier kits tend to use a stronger ABS resin grade, sharper molds, and factory-matched mount points, all of which reduce fairing fitment problems. That said, a reputable mid-priced set from a maker with good reviews often beats an overpriced no-name kit. Focus on resin specs, tab design, and return policy rather than the sticker price alone.
Quick Reference: What Drives Fitment Quality
| Factor | Good Sign | Warning Sign |
|---|---|---|
| ABS resin grade | Solid thud, flexes and recovers | Thin rattle, whitens when bent |
| Mount points | Factory-matched grommets | Glued or relocated tabs |
| Panel walls | Consistent thickness | Uneven or paper-thin |
| After heat cycles | Holds shape | Warps near exhaust |
Why Mount Points and Resin Grade Are the Deciding Factors
When you strip away the marketing language, fairing fitment comes down to two physical realities: where the panels attach and what they are made of. Mount-point accuracy determines whether the plastic has been shaped to meet your bike’s frame, subframe, and bracket geometry. ABS resin grade determines whether that plastic holds its shape once heat, vibration, and time go to work on it. Neither factor can rescue the other. A perfectly drilled panel made from brittle, under-spec material will warp and pull away from its neighbors, while a high-grade shell built on imprecise anchors will sit crooked no matter how careful your installation is.
How Each Factor Shows Up in the Gaps
That is what makes the visible gaps so telling. Mount points drive alignment along the seams, the headlight surround, and the tail section, and any drift there produces uneven spacing, stress points, and panels that fight each other. Resin grade drives stability, so a weak compound lets those gaps widen or shift as temperatures rise and the fairing flexes. Two kits that look identical in photos can behave completely differently on the same motorcycle.
The practical guidance from earlier applies here: verify anchor positions against your specific model and year, and insist on genuine ABS with a resin grade suited to your riding conditions rather than accepting vague material claims.
For buyers who want that consistency without guesswork, a supplier with a catalog of more than 3,000 styles covering almost every motorcycle model, pricing that runs 10 to 40 percent lower, and a six-hour response guarantee removes some of the risk. One example is the supplier featured here; you can explore the full range at summitfairings.com.
Mold precision and resin formulation keep improving, so the gap between factory and aftermarket parts will probably keep narrowing. Until then, the approach is the same: judge a kit by its anchors and its resin, because those two details decide how your motorcycle looks in the end.